How to Remove a Stuck Aerator from a Faucet
Introduction
Aerators are an important part of most faucets, but they can become stuck over time due to rust, mineral build-up, or hard water. If your aerator is stuck, it can be tempting to call a plumber right away, but this is often unnecessary. With the right tools and techniques, removing a stuck aerator from your faucet is relatively straightforward.
In this guide, we’ll take you through each step of the process to help you remove your stuck aerator safely and effectively.
Materials Needed
Before you get started, make sure you have the following materials on hand:
- Vinegar or Lime-A-Way cleaner
- Pliers or adjustable wrench
- Duct tape or rubber bands (optional)
Vinegar or Lime-A-Way cleaner
Vinegar or Lime-A-Way cleaner can help dissolve mineral build-up and loosen corrosion on your aerator. Make sure you have enough of one of these cleaners on hand before you start the removal process.
Pliers or adjustable wrench
You will need pliers or an adjustable wrench to twist and loosen the aerator. Make sure the pliers/wrenches fit comfortably around the aerator’s cap for effective loosening.
Duct tape or rubber bands (optional)
If your aerator is very tight, duct tape or rubber bands can be used for grip assistance.
Understanding Aerators and Faucets
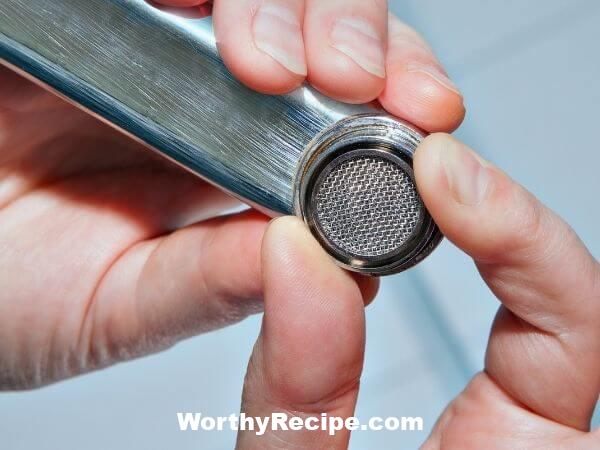
Before removing your faucet aerator, it’s essential to know what an aerator is and how it functions. An aerator is a small mesh screen that mixes air with water as it flows out of the spout. The result is a more consistent and even flow of water, which helps conserve water. Aerators come in different sizes and shapes, and you should know the type of aerator on your faucet before attempting a removal.
Different faucets have different types of aerators and other applications that hold the aerators. Knowing this can significantly impact the approach to removing the stuck aerator.
Types of Aerators
There are several types of aerators, including:
- Standard – typically found on kitchen faucets
- Aerator with male threads – typically found on bath sink faucets
- Aerator with female threads – typically found on small faucets such as those used outside or for decorative purposes
- Cascade aerators – typically favored in public restrooms
Each type requires a different approach for removal, depending on its make and model.
Detecting a Stuck Aerator
Before starting to remove an aerator from your faucet, it’s essential to make sure you’re dealing with a stuck aerator. Here are some common indicators that your aerator is stuck:
- The water flow is uneven or low.
- The water pressure has decreased.
- The water stream appears unsteady or scattered.
If you’re experiencing any of these issues when you turn on your faucet, it’s likely that your aerator is clogged or jammed.
Moreover, Faucet head or spout may produce noise from its pipes due to the blocked flow.
Preparing to Remove the Aerator
Once you’ve detected that you have a stuck aerator; preparing to remove it requires safety consideration and cleaning instructions.
Safety Measures
Whenever you’re working with pipes or plumbing fixtures, it’s essential to take safety precautions to avoid injury.
Ensure that your faucet is turned off and that the valves beneath the sink are also shut. Cover the sink drain with a stopper for safekeeping of dropped tools or aerators.
Cleaning Instructions
Before beginning the removal process, it’s crucial to clean the aerator and surrounding areas to prevent contamination.
Spray vinegar or Lime-A-Way generously over the aerator, and allow it to sit for 10-15 minutes. Use an old toothbrush to scrub away any mineral deposits or rust gently.
Clean all surfaces around the aerator and remove any debris or dirt that may have accumulated before proceeding with the removal process.
Steps to Follow
Follow these steps to remove your stuck aerator:
1. Cover the faucet spout with an old towel or cloth to avoid scratching it as you work.
2. Use your pliers or adjustable wrench (or tape/rubber bands if needed) to grip onto the aerator cap
3. Slowly turn the wrench counterclockwise until you feel movement.
4. Once there is movement, keep turning slowly until you can unscrew by hand.
5. If the aerator resists by hand too, add more cleaning solution/vinegar and try turning again.
6. Once freed, rinse cleaned parts in water to remove residual debris before reattaching.
Removing Your Stuck Aerator
The method for removing a stuck aerator differs depending on how tightly it’s stuck and which type of faucet they are installed in.
Removing an Aerator by Hand
Suppose you have a standard kitchen or bath faucet’s male-threaded aerator. In that case, you can usually unscrew it by hand after firmly gripping its cap using your fingers or cloth.
Loosening a Kitchen Aerator
- Place your pliers or adjustable wrench around the aerator dome, turn it counterclockwise until it begins to rotate.
- Keep moving it by hand; jiggle back and forth should help to loosen.
- Remove it entirely after you have loosened it enough.
- Clean any excessive debris with a gentle brush before reinstalling Aerators again.
Removal of bathroom sink faucet aerator
- Carefully grip the rounded end of the aerator cap from either underneath or above (depending on what kind of female-threads aerator that your faucet has) with pliers/console.
- Turn and twist the cap gently (and slowly) counterclockwise until you feel movement or the full detachment from its fixture.
- If it resists removing by hand still, apply heat to the screws that hold it in place to expand it and cause the rust/ mineral-build-up, soap scum to lose weight.
- Clean any excessive debris with a gentle brush before reinstalling Aerators again.
Duct Tape/Rubber Bands Grip Assistance
Duct tape or rubber bands are useful when you don’t have a set of pliers, adjustable wrenches, or when there is too much slippage from smooth aerator’s handles.
Wrap duct tape tightly around the cap of your stuched aerator, grip it tightly, and turn the cap counterclockwise. Rubber bands work similarly to duct tape by providing a more reliable grip on the aerator.
However, both options require that you twist gently and firmly to avoid breaking or damaging surrounding fixtures.
Using Pliers or Adjustable Wrenches
If your aerator is still stuck even after attempting to remove it with your hands or using duct tape/rubber bands, pliers or an adjustable wrench can be used.
To use pliers/wrenches:
- Selects appropriate size of either pliers or wrenches and turns the aerator cap counterclockwise.
- Be careful not to apply too much force excessively, which may cause damage to the faucets and plumbing lines.
Once the aerator is loose, begin twisting it counterclockwise with your hands, turning for a complete detachment.
Cleaning and Replacing the Aerator
After successfully freeing the aerator from its fixture attachment, you’ll need to clean it before reinstalling it onto your faucet. Here are some guidelines for cleaning:
- Rinse out any debris or loose parts that may have accumulated during removal before cleaning.
- Place fine screens in vinegar/ Lime-A-Way solution or any other recommended cleaners overnight for perceived clogs in screen openings.
- Soak rubber gaskets in vinegar for removing any build-up.
Assemble clean parts carefully back together after draining and completely drying them by hand/towel.
Additional Aerator Care
Regular maintenance of aerators is essential in preventing future clogs and build-ups of minerals. Cleaning your aerators regularly should at least be done twice a year but may differ based on household water source quality.
To reinstall the clean aerator, appropriate care must be observed.
You can replace an aerator by:
- Slightly tightening the new aerator with your finger until it’s snug for a proper fits.
- Using pliers to tighten it further but to hand torque tightness.
- Ensure you should not overtighten- which may cause water leaks or breakage of fixtures because of over-torqued applications.
Removing and replacing any rubber washers in the fixture should be done while you’re in this process if they become old or are prone to breaking with frequently used fixtures.
Troubleshooting and Cautionary Tips/Advice
Sometimes, even after taking every step necessary, you may not be able to remove your stuck aerator. If you’re unable to remove it on your own after attempting all methods:
- Contact a professional plumber- professionals who have specialized knowledge of plumbing fixtures can locate and assess difficult to remove aerators.
- Do not try to use excessive force- using excessive force when trying to uninstall stuck aerators risks breaking the fixtures apart with collateral damage.
- Clear up debris around the sink- while uninstalled aerator, the faucet will flow uncontrollably, collecting debris that may lead to blockages in your plumbing or affect drainage fixtures in nearby compartment.
- Signs of underlying problems: In a few instances, having a stuck aerator is a symptom of more critical underlying problems in either household pipes or plumbing mechanisms. Therefore assure that intentions are made when diagnosing issues related to this for premature detection can save money and prevent significant system damage
Conclusion
Aerator maintenance is critical in ensuring that your faucets function correctly; getting a stuck aerator can be prevented through regular cleaning of mineral build-up. Before calling in professional help, you can follow the guided steps here to uninstall stuck aerators safely and confidently. Remember to observe safety measures, clean all used parts correctly, and carefully reassemble them in the fixture.
By doing so, the lifespan of your fixtures can be prolonged, and issues arising from prolonged usage due to mineral build-up can be avoided.
Why is the aerator stuck on my faucet?
It could be due to mineral buildup or corrosion that has occurred over time. Another reason could be improper installation or tightening of the aerator.
What tools do I need to remove a stuck aerator from my faucet?
You will need pliers, a wrench, or a pair of channel locks to grip and loosen the aerator. You may also require some lubricant such as vinegar or WD-40 to help loosen the aerator if it is difficult to turn.
How do I remove a stuck aerator from my faucet without damaging it?
First, try using your hands and turning the aerator counterclockwise. If this doesn’t work, use pliers or a wrench covered with a cloth to protect the surface of the aerator before you grip it. Turn the pliers gently but firmly until the aerator starts to loosen. Be careful not to apply too much force as this could damage the threads on both the faucet and aerator.
What should I do if I still can’t remove the stuck aerator?
If you have tried all of the previous methods without success, it may be time to call in a professional plumber who has more experience dealing with faucets and plumbing fixtures. A professional plumber will be able to remove the stuck aerator without damaging your faucet or causing more problems.


