How to Remove a Grohe Kitchen Faucet Handle
A stunning Grohe kitchen faucet is a great addition to any home. It adds elegance, functionality, and technology all in one place. However, like any other kitchen fixture, even the most high-tech faucet system needs some upkeep from time to time. Hence, learning how to remove a Grohe kitchen faucet handle can easily make your life in the kitchen much easier by knowing how to maintain and fix it when necessary.
In this article, we’ll guide you on how to remove the handle of your Grohe kitchen faucet. We’ll cover every aspect of this process in detail while also providing maintenance tips that will help you extend the life of your kitchen faucet.
Pre-requisites
Before diving into the actual process of removing the Grohe kitchen faucet handle, make sure you have some essential tools on hand. Here’s what you should have:
- Flathead screwdriver
- Phillips screwdriver
- Allen wrench set
- Tongue-and-groove pliers (optional)
- Plumber’s grease
- Cloth or towel
Additionally, make sure that you take proper safety precautions so that you don’t harm yourself or cause damage to your fixture. Turn off the water supply to the sink and place a cloth or towel underneath it before starting.
Step-by-step Guide To Remove a Grohe Kitchen Faucet Handle
Now that you have everything ready let’s start with our step-by-step guide for removing the Grohe kitchen faucet handle.
Step 1: Identify the type of Grohe kitchen faucet handle system
Before attempting to remove the handle itself, it’s important first to identify the type of handle system your Grohe kitchen faucet has. There are two types:
- The single-handle system that requires only one hole for installation.
- The double-handle system that requires two holes for installation – one for hot water and another for cold water.
Knowing which system you have is important since the process of removing the handle in each case is different.
Step 2: Turn off the water supply
Shut off the water supply to the sink by turning off the valves under it. They may be located at the rear of the cabinet, or you might have to get underneath the sink to locate them. Turn them clockwise until tight.
Step 3: Release the set screw that secures the handle to the cartridge stem
Using an Allen wrench, remove the set screw at the base of the handle. This screw is usually concealed beneath a decorative cap or cover. To locate it, feel around just below your faucet handle until you feel a small hole with a hexagonal shape.
Insert your Allen wrench into this hole and turn (counterclockwise) until you feel it grab onto something. At this point, continue turning until you completely unscrew this set screw, then pull off its decorative cap or cover.
Step 4: Lift and remove the handle from the cartridge stem
Now that you removed its set screw go ahead and lift straight up on your faucet handle. Apply a little bit of pressure with your hand if necessary; covered hands may allow better grip to prevent slipping. It should come right off easily.
If it resists removal, wiggle it gently back and forth or rotate it slightly as you lift until it comes loose. Be sure not to use excessive force as that may cause damage to your fixture.
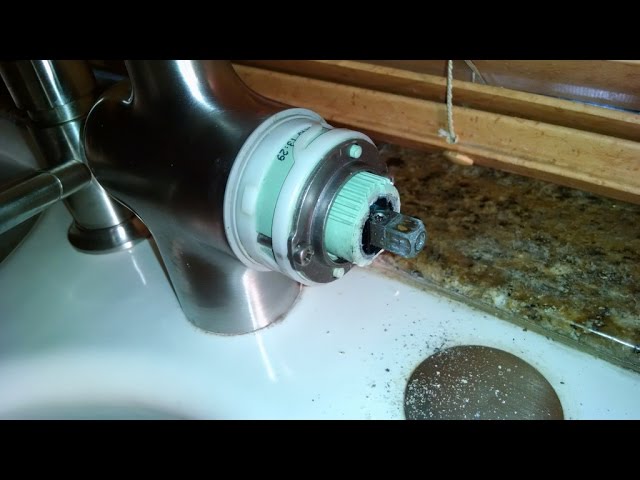
Step 5: Inspect cartridge stem for damage or wear
With the handle removed, take a moment to inspect its cartridge stem that’s beneath it. You’re looking for any signs of damage or wear, such as scratches, dings, cracks, or rust.
If you do notice any damage or wear on the cartridge stem, that might be the reason why your faucet has been malfunctioning. If it appears to be in good condition, then no further action is necessary. If not, replace the cartridge stem as needed.
Step 6: Replace any damaged or worn parts as needed
As mentioned above, if you discovered any problems with the cartridge stem in step 5, now would be a good time to replace it with a new one. You may need to order that part directly from Grohe or through an online retailer.
Before installing a replacement part on your item, it’s also important to lubricate it with plumber’s grease. That will help prevent any corrosion or future issues.
Removing Stuck Handles
Sometimes your faucet handles can become firmly stuck onto their threaded spindles—a daunting problem if encountered mid-project. They may have developed mineral build-up after years of being submerged in hard water or just become settled in tightly over time.
Here are some methods you can try:
- Pliers: Try using tongue-and-groove pliers carefully to grip the base of the handle & try twisting it off gently.
- Heat: You can expose it to heat by using heat guns, hairdryers, etc. Plug nearby holes before proceeding and apply gentle heat (so that you don’t cause burns). This may expand the metal enough to allow them to twist off freely.
- All-purpose Vinegar: Soaking them for some time in a shallow bowl of standard, household vinegar can dissolve the mineral buildup that’s locking them in place. Alternatively, you can dip a clean cloth in vinegar and wrap this around the base of your handle as a more localized treatment.
Be cautious when using forceful methods to remove the handle; it can lead to breakage or damage to other parts of your fixture.
Maintenance Tips
Like all things, if maintained properly, your Grohe kitchen faucet will stand the test of time. Here are some tips:
- Regularly cleaning your faucet handles with mild soap and warm water will keep them looking shiny.
- It is also recommended that you lubricate your faucet handle with plumber’s grease at least once a year. That will help protect it against rust or other types of corrosion.
- If there’s mineral build-up on the handle, soak it for 1 hour in a mixture of 1 part water and 1 part white vinegar. This remedy will effectively clean off such deposits, making your fixture look as good as new.
Common Issues and Solutions
Over time your Grohe kitchen faucet may experience several issues. Here are some common problems and their solutions:
Broken Handles or Set Screws: If you have a broken handle or set screw use pliers and a penetrating oil like WD-40 to loosen them. Otherwise, replace these parts with new ones.
Difficulty in Turning the Handle: Re-tighten any screws that may have come loose on the backside of its cartridge stem as this may be the cause of this difficulty.
Leaking Faucets: If your Grohe kitchen faucet is leaking, start by checking its O-ring for damages. Make sure it’s well-seated & haven’t worn out & need replacement.
Conclusion
A beautiful Grohe kitchen faucet can be a valuable addition to your home, but it does require care and upkeep. Make sure to follow our step-by-step guide on how to remove the Grohe kitchen faucet handle to give it the maintenance it needs & help keep it working its best for years to come. Finally, don’t forget to regularly clean and lubricate all parts of your faucet for optimal performance.
How do I remove a Grohe kitchen faucet handle?
To remove a Grohe kitchen faucet handle, you need to locate the set screw at the base of the handle. Use an Allen wrench to loosen and remove the screw. Once the screw is removed, gently wiggle and pull the handle away from the faucet.
Is it possible to remove a Grohe kitchen faucet handle without any tools?
No, unfortunately, you will need an Allen wrench to remove the set screw that holds the handle in place. However, if you don’t have an Allen wrench, they are easy to find at most hardware stores or online.
What should I do if my Grohe kitchen faucet handle won’t come off?
If your Grohe kitchen faucet handle won’t come off after removing the set screw, try using a gentle twisting motion while pulling outward on the handle. Additionally, using some WD-40 or other lubricant can help loosen the handle if it is stuck.
Can I reinstall my Grohe kitchen faucet handle after removal?
Yes, once you have completed the necessary repairs or maintenance on your Grohe kitchen faucet, simply align the handle back onto the base and tighten the set screw using an Allen wrench. Finally, test your faucet by turning it on and off to ensure proper functionality.


