Grohe kitchen faucets are among the most reliable and popular fixtures in modern kitchens. However, even these high-quality faucets require maintenance and repairs from time to time.
One of the most common tasks for Grohe homeowners is removing the faucet handle. Whether you are replacing a damaged component or seeking to clean your faucet more thoroughly, removing the handle is usually the first step.
Below is the ultimate guide to removing a Grohe kitchen faucet handle, including recommended tools, preparatory steps, and detailed instruction for various kinds of Grohe faucets.
Tools Needed
Before attempting to remove your Grohe kitchen faucet handle, it is important to have all necessary tools on hand. These include:
– An adjustable wrench
– A Phillips screwdriver
– Pliers (to remove stubborn components)
– Lubricating oil (such as WD-40)
– A cloth or towel (to protect sink surface)
While these tools should suffice for most removal jobs, you may also want to consider purchasing specialized equipment such as a basin wrench or a Grohe-specific cartridge removal tool. These can be helpful if you expect to undertake multiple plumbing projects in your home.
Preparation
Before beginning any work on your Grohe kitchen faucet, it is essential that you turn off the water supply completely. This can usually be accomplished by using the shut-off valve located beneath your sink, but if you’re unsure of where this valve is located, consult with a plumbing professional first.
Next, clear any debris or clutter from your sink area and wipe down the surface with a damp cloth or towel to ensure no small parts go missing during disassembly. Finally, identify the specific type of Grohe faucet you have; this will determine which steps are required during removal.
Removing a Basic Grohe Kitchen Faucet Handle
If your Grohe faucet has a single handle installed on top of your sink, removing it is relatively straightforward.
1. Locate the small plastic cap on the top of the faucet handle. Pry it off gently using a flathead screwdriver or your fingers.
2. Underneath the cap, locate the screw that holds the handle in place. Use a Phillips screwdriver to remove this screw. If it’s stubborn, lubricate it with oil and wait a few minutes for it to loosen.
3. After removing the screw, gently lift the handle upward and away from the faucet body. If it doesn’t come off easily, wiggle it back and forth while lifting to loosen any remaining parts from their grooves.
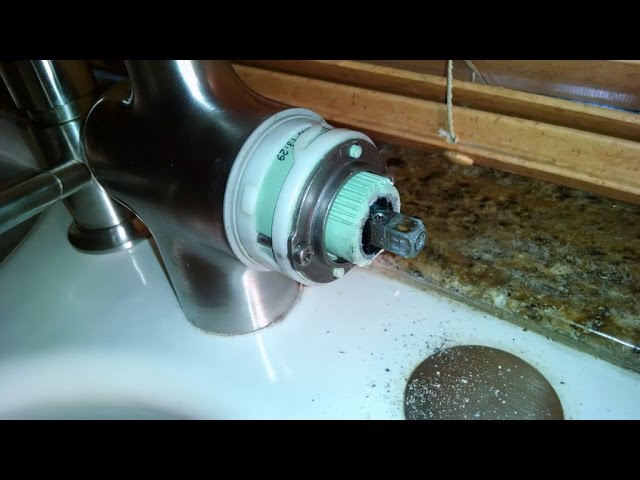
4. With the handle removed, carefully unscrew any additional fasteners that remain (such as a retaining ring) and set these aside.
5. With all parts removed, inspect them for signs of damage or wear. Replace any parts as necessary before reassembly.
Removing a Grohe Bridgeford Faucet Handle
If you have a Grohe Bridgeford kitchen faucet model installed in your home, you will need to follow some different steps for removing the handle:
1. Locate the small hole near the base of your Bridgeford faucet handle. This hole is typically located on the underside of the handle and may require a flashlight or extra illumination to see clearly.
2. Insert an Allen wrench (3/32” size) into the hole and turn it counterclockwise to loosen it. It may take several turns before you begin seeing progress.
3. Once you’ve loosened the set screw sufficiently, lift up on your Bridgeford faucet handle until it comes loose from its surrounding components.
4. Carefully examine all parts for damage or wear before reassembly and replacement as needed.
Removing a Grohe Ladylux Faucet Handle
Finally, if you own a Grohe Ladylux kitchen faucet, follow these instructions:
1. Locate the small plastic cap at the base of your Ladylux kitchen faucet handle; this cover conceals a screw that must be removed before you can lift the handle off.
2. Use a flathead screwdriver to gently pop the cover off, then use a Phillips screwdriver to remove the screw from beneath. If it’s stuck, lubricate it first.
3. Once the screw is out, grasp your Ladylux kitchen faucet handle with both hands and lift it directly upward. Do not pull side to side or twist it in any way as this could break internal components.
4. Inspect all parts for damage or wear before replacing damaged components and reassembling the handle with the correct orientation of any plastic pieces on the stem of the valve cartridge.
Removing a Grohe K7/F270/ Zedra Faucet Handle
If you have a Grohe K7, F270, or Zedra model faucet, follow these instructions:
1. Turn off the water supply completely and disassemble the faucet as much as possible, taking care not to bend or damage any tubing or valves.
2. Use an adjustable wrench or open-end wrench to remove any locking nuts holding your faucet handle in place.
3. For stubborn faucets that don’t come off easily, apply lubricating oil around the base of your faucet handle and wait several minutes for it to penetrate deep into any corroded or stuck threads.
4. Once all nuts have been removed and all other components taken apart, gently lift your faucet handle up and away from its surrounding parts.
5. Inspect all components for signs of damage or excessive wear before you begin reassembly and replacement. Make sure that any new parts are installed according to manufacturer specifications and with care so they do not break when underpressure.
Reassembling Your Grohe Faucet Handle
After successfully removing your Grohe kitchen faucet handle, it’s important to take time during reassembly to prevent leaks or further damage. Here are some tips:
1. Properly orient each component before reinserting them. Ensure there are no kinks or sharp bends in any hoses, and align the internal splines of your valve cartridge correctly with the slot in your faucet handle.
2. Replace any worn or damaged components, such as O-rings or seals.
3. Tighten each nut gently but firmly, making sure not to over-tighten which could cause damage to other components.
4. Turn on the water supply and test for leaks carefully. Check around all connections, including the base of the faucet handle, and give the system a full five minutes to ensure water flows steadily without interruption.
Prevention and Maintenance Tips
After reassembling your Grohe kitchen faucet handle, take some preventive measures to keep it functioning optimally:
1. Clean your faucet regularly using only plain soap and water. Avoid harsh chemicals which can corrode the pipe parts over time.
2. Keep all screws, nuts, bolts well lubricated with oil or another liquid that helps reduce friction on metal surfaces to reduce wear and tear on your Grohe kitchen faucet handle.
3. Routinely check for any leaks in the system, from pipes to valves to exterior seams around sealants or grouting.
Conclusion
In summation, removing a Grohe kitchen faucet handle can be done by following specific steps outlined above depending on the particular model you own. Following those steps with the correct tools and safety precautions should relieve frustration when uninstalling parts of this modern fixture.
A clear understanding of whether parts need replacement or repair before reassembly can increase efficiency when working on projects at home as well as maintain proper functioning of your Grohe kitchen faucet for years to come.
Frequently Asked Questions
1. Can I remove a Grohe kitchen faucet handle by myself?
Yes, you can remove a Grohe kitchen faucet handle by yourself with basic tools and following simple steps.
2. What tools do I need to remove the Grohe kitchen faucet handle?
You will need an adjustable wrench or a pair of pliers, a flathead screwdriver, and a hex key wrench to remove the Grohe kitchen faucet handle.
3. How do I know if my Grohe kitchen faucet handle is threaded or has a set screw?
To determine if your Grohe kitchen faucet handle is threaded or has a set screw, you can check the underside of the handle for a small hole, which indicates it has a set screw. If there is no hole, it is likely threaded.
4. How long does it take to remove the Grohe kitchen faucet handle?
Removing the Grohe kitchen faucet handle should only take a few minutes if you have all the necessary tools and follow the recommended steps carefully. However, this may vary depending on the complexity of your specific faucet model and any underlying issues.


