Split peas are a nutritious and versatile ingredient that can be used in a variety of recipes, including soups, stews, dips, and salads. However, knowing when split peas are done is essential to achieving the desired texture and consistency. In this guide, we’ll cover everything you need to know about cooking and testing for doneness when it comes to split peas.
Understanding Split Peas
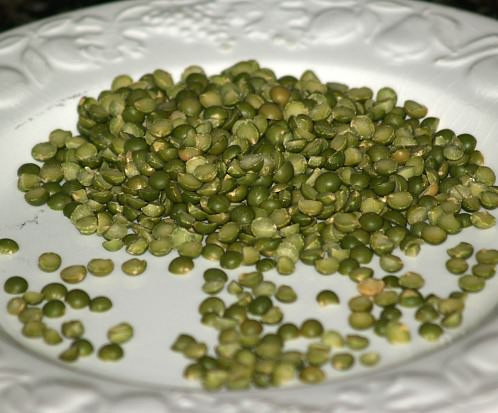
Split peas are dried legumes that have been stripped of their outer hulls and split in half. They come in two common varieties: green and yellow. Green split peas have a milder flavor than yellow split peas and hold their shape better during cooking. Yellow split peas have a slightly sweeter taste and tend to break down more easily. Both types of split peas are an excellent source of fiber, protein, iron, magnesium, potassium, and folate.
Cooking Split Peas
Before cooking split peas, they should be rinsed thoroughly under cold running water to remove any dirt or debris. Unlike some other legumes, such as black beans or kidney beans, there’s no need to soak split peas before cooking them.
Next comes choosing the right cooking method based on your recipe type and personal preference. Some people prefer using a slow cooker because it’s easy and hands-off while others prefer stovetop cooking because it allows more control over the heat.
Factors such as pot size, stove heat intensity, elevation may affect your cooking time. Keep these factors in mind when setting your timer so you can get the perfect consistency for your dish.
Testing Doneness
There are several ways to test whether your split peas are done:
Texture
You want your cooked split pea to be soft but still hold its form instead of mushing up entirely into paste. The texture should feel tender in your mouth but not too delicate that it falls apart at light touch or pressure.
Color
When cooked fully from start to finish, the color of split peas shifts from brighter and vivid green to a more muted and olive-tinged hue. The texture should not be grainy or watery.
Using Timers to Measure Doneness
Using timers is an effective way of ensuring your split peas have cooked adequately. You can set your timer based on recipe instructions or based on what has worked best for you in past experiences. Set your timer with enough time for the peas to cook fully, allowing you to make necessary changes if required.
Common Mistakes When Cooking Split Peas and How to Fix Them
Overcooking or undercooking the split peas could ruin your dish’s taste, so it’s essential to get it right. The following are some ways you could fix it.
Salvaging Overcooked Split Peas
If you’ve accidentally overcooked your split peas, they may have become mushy or lumpy-like texture. Here are some ways to salvage them:
- Adding liquid – water, stock or vegetables like tomatoes into the split pea mixture can help balance out its richness.
- Pulsing overcooked mix in blender for dips – Blending could be downsized as an alternative if soaking up more moisture isn’t desired.
Reviving Undercooked Split Peas
If you’ve noticed that your split pea is still hard after cooking and testing done regularly, there two main methods of reviving under-cooked split peas:
- Boil additional water: Add water into a pot and boil with already cooked /semi-cooked split pea mixture
- Crockpot: Allow for further cooking in Crockpot until perfect unto desired consistency
Storing Cooked Split Peas
Now that we have successfully cooked our desirable semi-solid textured/consistency away from being mushy sobs or being unappetizingly hard let’s find ways of storing it correctly when needed.
Fridge Storage
Since cooked split peas tend to spoil quickly, it’s best to store them in the fridge if you plan to use them within a few days. Place them in an airtight container and store them in the refrigerator with a shelf life recommendation of three to four days utmost.
Freezing Cooked Split Peas
If you’re cooking big batches of split peas or want to prepare food ahead of time, freezing is your perfect solution. Below are recommended steps on how to proceed.
Proper Packaging for Freezing
- Allow it to cool entirely before packaging it up.
- Portion out into serving sizes container that has lids.
- Make sure no air is left out before covering the container with its lid
- Use freezer-friendly containers that don’t break or crack easily.
Duration Kept
Split pea soups can be frozen and kept for about three months while cooked split-pea meals for salads, stews or dip may expire earlier because of their vegetable base mixtures — so they are best eaten within two months maximum.
Conclusion
Cooking perfect split peas takes patience and attention. We’ve highlighted key considerations when preparing this delicious legume both successfully cooking and ensuring its ideal texture by clarifying how split peas should appear doneness wise as well as patterns/steps on how best we could save/maintain any excess cooked bean mixture without worrying about wastage if done correctly. Keep experimenting with new recipes and techniques until you become perfect at cooking split peas!
Q&A
- Q: How can I tell if my split peas are fully cooked? A: The best way to test if your split peas are done is to take a few out of the pot and crush them between your fingers. If they mash easily, they’re cooked!
- Q: Can I rely on cooking time alone to know if my split peas are ready? A: It’s a good idea to use cooking time as a rough guide, but split peas can vary in how long they take to cook depending on age and freshness. So while it’s helpful to keep track of time, also use the crush-test method.
- Q: What happens if I don’t cook my split peas enough? A: Undercooked split peas can be tough and have an unpleasant texture. Depending on how undercooked they are, they could also cause digestive issues or leave you feeling bloated.
- Q: Is there anything else I should be aware of when cooking split peas? A: Yes! Split pea skins can sometimes float to the top of your cooking liquid during the cooking process – this is normal and doesn’t affect their taste or texture at all. Additionally, adding salt or acidic ingredients (like vinegar or lemon juice) too early in the cooking process can make them tough, so wait until the end of cooking before seasoning to taste.


